Single Node Single Disk Mode (SNSD, Single Node Single Disk)
1. Pre-Installation Reading
This document contains RustFS single-node single-disk deployment mode.
Review the three installation startup modes:
Pre-Installation Check, ensure all items meet production guidance. If production standards are not needed, this guidance can be skipped;
Single node single disk is suitable for low-density non-critical businesses. In production environments, it's recommended to have experience with data backup to avoid data risks.
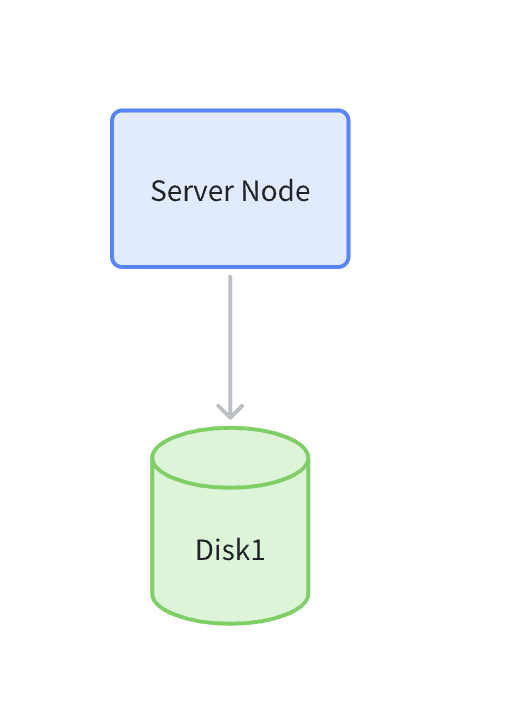
1 server with only one data disk, all data falls into this one data disk.
Specific architecture diagram is as follows:
2. Prerequisites
- Operating system version;
- Firewall;
- Memory conditions;
- Time synchronization;
- Capacity planning;
- Disk planning;
- File system selection;
2.1. Operating System Version
We recommend Linux kernel version 4.x and above. Because versions 5.x/6.x can achieve better IO throughput and network performance.
You can use Ubuntu 22.04 and RHEL8.x to install RustFS.
2.2 Firewall
Linux systems have firewalls enabled by default. You can use the following command to check firewall status:
systemctl status firewalldIf your firewall status is "active", you can use the following commands to disable the firewall:
systemctl stop firewalld
systemctl disable firewalld
Or allow RustFS port 9000:
firewall-cmd --zone=public --add-port=9000/tcp --permanent
firewall-cmd --reload
All RustFS servers in the deployment must use the same listening port. If you're using port 9000, all ports on other servers need to be port 9000.
2.3 Memory Conditions
RustFS needs at least 2 GB of memory to run test environments, production environments need a minimum of 128 GB of memory.
2.4 Time Synchronization
Multi-node consistency must use time servers to maintain time consistency, otherwise there may be situations where services cannot start. Related time servers such as using ntp, timedatectl, or timesyncd.
RustFS needs time synchronization. You can use the following command to check time synchronization status:
timedatectl statusIf the status is "synchronized", time synchronization is working properly.
2.5 Capacity and EC Planning
When planning object storage capacity, we recommend you base it on:
- Initial data volume: How much data do you plan to migrate or store at once? (e.g., 500 TB)
- Data growth volume: Daily/weekly/monthly data growth capacity;
- Planning cycle: How long do you hope this hardware planning can support? (Recommendation: 3 years)
- Consider your company's hardware iteration and update cycles.
EC (Erasure Coding) planning is as follows:
| Scenario | Recommended Check Level | Description |
|---|---|---|
| Standard Production Environment | EC:4 | Can tolerate up to 4 disk (or node) failures, achieving good balance between reliability and storage efficiency. |
| High Availability Requirements | EC:4 - 8 | Or higher, suitable for scenarios with extremely high data availability requirements, but will sacrifice more storage space. |
| Development Test Environment | EC:2 | Provides basic redundancy protection, suitable for non-critical businesses. |
2.6 Disk Planning
Due to NFS generating phantom writes and lock issues under high IO conditions, NFS is prohibited as the underlying storage medium for RustFS. The official strongly recommends using JBOD (Just a Bunch of Disks) mode, which means simple disk bundling. This means exposing physical disks directly and independently to the operating system, with RustFS software layer responsible for data redundancy and protection.
Reasons are as follows:
- Better Performance: RustFS's Erasure Coding engine is highly optimized, able to directly read and write multiple disks concurrently, achieving higher throughput than hardware RAID controllers. Hardware RAID becomes a performance bottleneck.
- Lower Cost: No expensive RAID cards needed, reducing hardware procurement costs.
- Simpler Management: Unified disk management by RustFS, simplifying storage layer operations.
- Faster Fault Recovery: RustFS (healing) process is faster than traditional RAID rebuild, with less impact on cluster performance.
The official recommends using NVMe SSD as your storage medium on disks to ensure higher performance and throughput capabilities.
2.7 File System Selection
For disk file system formatting, RustFS strongly recommends using XFS file system on all disks used for storage. RustFS development and testing are based on XFS, ensuring optimal performance and stability. Avoid using other file systems such as ext4, BTRFS, or ZFS, as they may cause performance degradation or unpredictable issues.
RustFS is an object storage system designed for high concurrency and high performance. When clients upload or download large objects, RustFS will shard them and read/write in parallel to multiple disks in the erasure set (Erasure Set).
XFS advantages: XFS (eXtents File System) was designed from the beginning for high performance and scalability. It performs extremely well in large file processing and high-concurrency I/O scenarios. Its internal journal and data structures (such as B+ trees) can efficiently handle large numbers of parallel read/write requests, perfectly matching RustFS's working mode. In comparison, although file systems like ext4 have made great performance improvements in recent years, when facing extreme concurrent loads, XFS usually provides more stable and superior throughput.
Object storage typically needs to handle massive files and huge individual files (TB level). XFS is a 64-bit file system that can support extremely large file sizes (up to 8 EB) and file system scale. Its metadata management is very efficient, even when storing millions of files in a single directory, its performance degradation is much smaller than other file systems. This is crucial for RustFS's approach of storing each object (or version of an object) as an independent file on the backend file system.
When RustFS writes new objects or object versions, to ensure write performance and reduce file fragmentation, it performs space reservation. XFS provides an efficient API called fallocate, allowing applications to reserve a continuous block of disk space. RustFS leverages this feature to allocate required space for files before writing, avoiding performance overhead from dynamic expansion and metadata updates during the write process, while also minimizing file fragmentation to the greatest extent, ensuring subsequent read performance.
For better disk discovery, when formatting xfs file systems, we recommend using Label tags to mark disks.
First, you need to check the disk system situation:
sudo lsblk

NAME        MAJ:MIN RM   SIZE RO TYPE MOUNTPOINT
sda           8:0    0 465.7G  0 disk
├─sda1        8:1    0   512M  0 part /boot/efi
└─sda2        8:2    0 465.2G  0 part /
nvme0n1           8:16   0   3.7T  0 disk  <-- if this is our format new disk
nvme1n1           8:32   0   3.7T  0 disk  <-- if this is our format new disk
nvme2n1          8:48   0   3.7T   0  disk
Specific formatting command is as follows:
sudo mkfs.xfs -i size=512 -n ftype=1 -L RUSTFS0 /dev/sdbYou can add the following options during formatting to optimize performance:
- -L <label>: Set a label for the file system, convenient for subsequent identification and mounting.
- -i size=512: RustFS officially recommends setting inode size to 512 bytes, which has performance advantages for scenarios storing large numbers of small objects (metadata).
- -n ftype=1: Enable ftype functionality. This allows the file system to record file types in directory structures, improving performance of operations like readdir and unlink, beneficial for RustFS.
Mounting:
# write new line
vim /etc/fstab
LABEL=RUSTFS0 /data/rustfs0   xfs   defaults,noatime,nodiratime   0   0

#save & exit

# mount disk
sudo mount -a
3. Configure Username
When RustFS starts, we recommend you configure a dedicated user without login permissions to start RustFS services. In the rustfs.service startup control script.
- Don't modify default startup account: Default user and group are
rootandroot. If you want to use the defaultrootandroot, no modifications are needed. - Modify default startup account: You can use groupadd and useradd commands to create users and groups, then modify the username and password in the systemctl startup configuration file.
The following example shows creating users, groups, and setting permissions to access RustFS specified data directories (optional):
groupadd -r rustfs-user
useradd -M -r -g rustfs-user rustfs-user
chown rustfs-user:rustfs-user  /data/rustfs*
Note:
- If rustfs-user user and group are created, you need to change User and Group in
/etc/systemd/system/rustfs.servicetorustfs-user; - Adjust
/data/rustfs*to the specified mount directory.
4. Download Installation Package
First, install wget or curl to download the rustfs installation package.
# Download address
wget https://dl.rustfs.com/artifacts/rustfs/release/rustfs-linux-x86_64-musl-latest.zip
unzip rustfs-linux-x86_64-musl-latest.zip
chmod +x rustfs
mv rustfs /usr/local/bin/
5. Configure Environment Variables
- Create configuration file
# Single node single disk mode
sudo tee /etc/default/rustfs <<EOF
RUSTFS_ACCESS_KEY=rustfsadmin
RUSTFS_SECRET_KEY=rustfsadmin
RUSTFS_VOLUMES="/data/rustfs0"
RUSTFS_ADDRESS=":9000"
RUSTFS_CONSOLE_ENABLE=true
RUST_LOG=error
RUSTFS_OBS_LOG_DIRECTORY="/var/logs/rustfs/"
EOF- Create storage directories
sudo mkdir -p /data/rustfs0 /var/logs/rustfs /opt/tls
sudo chmod -R 750 /data/rustfs* /var/logs/rustfs
6. Configure System Service
- Create systemd service file
sudo tee /etc/systemd/system/rustfs.service <<EOF
[Unit]
Description=RustFS Object Storage Server
Documentation=https://rustfs.com/docs/
After=network-online.target
Wants=network-online.target

[Service]
Type=notify
NotifyAccess=main
User=root
Group=root

WorkingDirectory=/usr/local
EnvironmentFile=-/etc/default/rustfs
ExecStart=/usr/local/bin/rustfs \$RUSTFS_VOLUMES

LimitNOFILE=1048576
LimitNPROC=32768
TasksMax=infinity

Restart=always
RestartSec=10s

OOMScoreAdjust=-1000
SendSIGKILL=no

TimeoutStartSec=30s
TimeoutStopSec=30s

NoNewPrivileges=true

ProtectHome=true
PrivateTmp=true
PrivateDevices=true
ProtectClock=true
ProtectKernelTunables=true
ProtectKernelModules=true
ProtectControlGroups=true
RestrictSUIDSGID=true
RestrictRealtime=true

# service log configuration
StandardOutput=append:/var/logs/rustfs/rustfs.log
StandardError=append:/var/logs/rustfs/rustfs-err.log

[Install]
WantedBy=multi-user.target
EOF- Reload service configuration
sudo systemctl daemon-reload7. Start Service and Verification
- Start service and set auto-start on boot
sudo systemctl enable --now rustfs- Verify service status
systemctl status rustfs- Check service port
netstat -ntpl- View log files
tail -f /var/logs/rustfs/rustfs*.log- Access console
Enter the server's IP address and port (default port for the UI is 9001), try to access the console, the interface you see is as follows: